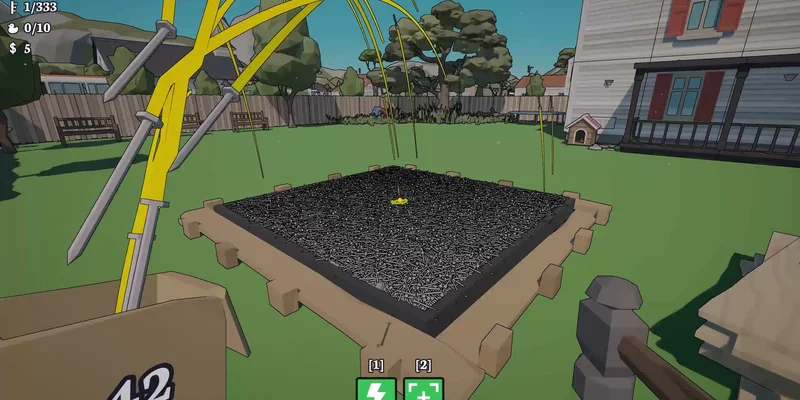
- Hammer these nails incremental game progression centers on placing and hammering nails efficiently.
- Selection radius improves how far you can interact with nearby nails and objects.
- Nail handling speed makes pickup, placement, and repeated repairs much faster.
- Strength and lightning help clear dense sections after your reach and speed are established.
- Best early route focuses on small objects, furniture, windows, and other low-cost repairs.
Hammer these nails Incremental Game Basics
Hammer these nails incremental game gameplay combines simple first-person repair tasks with incremental upgrades. The main objective is to restore a house and its surrounding objects by picking up loose nails, placing them into available slots, and hammering them into position. Completed objects pay money that can be invested into stronger tools and more efficient automation.
The opening minutes are intentionally hands-on. You collect nails with the interaction button, place them into highlighted slots, and hammer them individually or in groups. Small objects are useful early because they require fewer nails and provide a reliable way to build your first upgrade budget.
Video Highlights:
- Nail pickup, placement, and hammering controls
- Early repairs involving furniture, doors, and outdoor objects
- Upgrade choices for strength, reach, speed, and automation
- Progression through fences, windows, the house, and the roof
| Core Action | Purpose | Early Recommendation |
|---|---|---|
| Pick up nails | Adds loose nails to your hand or inventory | Collect nearby groups before moving |
| Place nails | Fills slots on repairable objects | Use grouped placement when several slots are close |
| Hammer nails | Completes repairs and triggers payment | Hold the hammer input when practical |
| Upgrade tools | Improves interaction and clearing speed | Prioritize reach and handling speed |
| Finish objects | Converts repairs into money | Start with small, accessible targets |
The game also includes optional discoveries and movement features. Ducks appear around the environment, while ladders and later movement abilities open access to higher areas. These discoveries are useful for exploration, but they should not distract from the first objective: building enough income to make every repair action faster.
Small Objects
Low nail requirements make chairs, small panels, and similar objects efficient early targets.
House Repairs
Doors, windows, walls, and roof sections provide larger repair goals as your tools improve.
Outdoor Areas
Fences, decks, dog houses, and signs create reliable mid-game money routes.
Exploration
Ducks, ladders, and elevated areas add optional objectives while revealing more of the map.
Do not begin with the largest visible repair. Build momentum with small objects first, then return to expensive sections after improving reach and nail handling speed.
Step-by-Step Opening Route
A strong opening route reduces walking and keeps your money moving into upgrades. The exact order can change depending on which nails are visible, but the principle remains consistent: complete cheap repairs, improve access, and then expand into larger structures.
Collect the First Nail Groups
Pick up loose nails close to your starting area and inspect nearby furniture, containers, signs, and small outdoor objects. Avoid spending too much time on a large fence or wall before you have enough carrying capacity and interaction range.
Complete Small Repairs
Place nails into the easiest available slots and hammer them in immediately. Small objects are valuable because they produce early payments without requiring a long trip or a large stockpile.
Buy Reach or Handling Speed
Use the first earnings on selection radius or nail handling speed. Reach affects how comfortably you can interact with distant slots, while handling speed reduces the time spent moving nails into position.
Revisit Dense Groups
Return to fences, windows, doors, and clustered furniture after the first upgrades. Your improved range should let you handle more slots from one position and reduce unnecessary movement.
| Route Stage | Main Targets | Upgrade Focus |
|---|---|---|
| Opening | Chairs, small panels, signs, simple objects | Selection radius |
| Early expansion | Doors, windows, deck pieces, dog house | Nail handling speed |
| Mid progression | Fence sections, walls, larger panels | Reach and extra nails |
| Late clearing | Roof, upper sections, remaining house repairs | Strength and lightning |
The dispenser and vacuum-style abilities become more valuable after you understand the local repair layout. A vacuum can collect nails over time, while a dispenser can place nails into nearby slots. These tools are most useful when many slots are grouped together, but they are less important than basic range and speed during the earliest repairs.
A practical route is to clear one visible area before crossing the map. Check both sides of objects, look behind panels, and use ladders when they become available. Missing a single nail can leave an object appearing unfinished even after most of its repair slots are complete.
Large fences and high-cost doors can consume your nail supply before your income is ready. If progress slows, return to smaller objects rather than repeatedly forcing one expensive section.
Best Upgrade Order and Tool Priorities
The upgrade system rewards a balanced approach, but not every option has the same impact at every stage. Selection radius and nail handling speed provide the clearest early improvements because they reduce both travel time and interaction time. Strength becomes more attractive once your reach is already comfortable and you are clearing dense areas quickly.
| Upgrade | Main Effect | Best Timing | Practical Value |
|---|---|---|---|
| Selection radius | Interact with nails and slots from farther away | Early and mid game | Excellent |
| Nail handling speed | Faster pickup, placement, and automated handling | Early and mid game | Excellent |
| Extra nails | Collect more nails with each pickup | After basic speed upgrades | Good |
| Dispenser | Places nails into adjacent slots automatically | Mid game | Good |
| Vacuum | Collects nearby nails over time | Mid game | Good |
| Strength | Increases hammer effectiveness | Mid and late game | Strong |
| Lightning | Hits nearby nails or adds area clearing | Late game | Situationally strong |
| Vision | Helps reveal missed or hidden nails | When cleanup becomes difficult | Useful |
A reliable priority order is:
- Selection radius
- Nail handling speed
- Extra nails
- Dispenser or vacuum
- Strength
- Lightning
- Vision when cleanup requires it
This order is not a rigid rule. If a repair zone has many loose nails close together, extra nails may be more valuable than another range upgrade. If you are repeatedly missing slots, vision can solve the problem faster than another damage increase. The best choice depends on what is slowing your current route.
Reach Build
Choose selection radius and reach improvements when objects are spread across walls, fences, windows, or elevated structures.
Speed Build
Choose handling speed, vacuum, and dispenser upgrades when many nails are already concentrated in one area.
Power Build
Choose strength and lightning after your basic movement and interaction loop feels efficient.
The most noticeable late-game improvement comes from combining range with automation. A wide interaction radius lets you affect more slots, while the dispenser reduces the number of manual placement actions. Lightning can then help clear nearby nails when several repair slots are active at once.
Upgrade the feature responsible for your current bottleneck. If you are walking too much, buy reach. If you are placing too slowly, buy handling speed. If you are missing nails, improve vision or inspect the area more carefully.
Repair Routes, Money, and Exploration
Money comes from completing repairable objects, so the best farming route is not necessarily the largest structure. Efficient targets combine low nail requirements, short travel distance, and easy access to multiple slots. Small furniture and compact outdoor objects are especially useful while your tools are still developing.
| Area | Typical Tasks | Route Advice |
|---|---|---|
| Starting yard | Small furniture, signs, containers | Clear nearby objects before exploring |
| House exterior | Doors, windows, panels, walls | Use reach to reduce repositioning |
| Fence line | Repeated fence sections | Save for stronger handling and extra nails |
| Deck and dog house | Dense outdoor repair slots | Good mid-game targets |
| Roof and upper areas | Elevated panels and roof sections | Use ladders and improved reach |
| Neighborhood edge | Exploration and optional discoveries | Visit after the current repair loop is stable |
Fences can become worthwhile once your carrying capacity, reach, and handling speed are improved. They contain many slots and can generate a noticeable payment, but they also demand more time than small objects. Treat them as a mid-game route rather than an opening target.
Windows and house panels are similarly useful because they create concentrated groups of slots. Before leaving an area, check the upper and lower portions of the structure. Some sections require access from a ladder or a different angle, so a quick visual sweep can prevent unnecessary backtracking.
Exploration has a secondary role in progression. Ducks are placed around the environment and can be found while traveling between repair zones. Ladders provide access to elevated areas, while later movement options make the surrounding neighborhood easier to inspect. These features add variety, but the main economy still comes from completing repairs.
| Situation | Best Response | Reason |
|---|---|---|
| Few nails in hand | Search the nearest completed or unfinished zone | Reduces downtime |
| Many slots nearby | Use dispenser and handling upgrades | Improves concentrated clearing |
| One object appears unfinished | Inspect behind, above, and below it | Missed slots may be out of view |
| Fence progress feels slow | Return to smaller repairs | Restores income and upgrade pace |
| Upper area is inaccessible | Look for a ladder or movement unlock | Progress may depend on elevation |
Treat each completed area as a checkpoint. Finish the nearby low-cost objects, spend your earnings, and only then commit to a larger structure such as a fence, wall, or roof section.
Completion Checklist and Final Cleanup
The final phase is about consistency rather than discovering a new strategy. Once most upgrades are active, move through the map methodically and use your improved range to identify unfinished slots. Large structures may look complete from one angle while still containing nails on a rear panel, upper section, or hidden side.
Progression Milestones:
- Complete several small repairs before attempting the largest structures
- Upgrade selection radius and nail handling speed early
- Unlock or use automation for dense nail groups
- Inspect fences, windows, walls, doors, decks, and roof sections
- Use ladders and exploration routes to find elevated repair areas
A final cleanup pass should follow a predictable pattern:
- Start at the house and inspect each visible wall.
- Check doors, windows, panels, and the roof from multiple angles.
- Move through the fence line in one direction instead of jumping between sections.
- Return to the deck, dog house, furniture, and other compact objects.
- Use vision or lightning if a missed nail remains difficult to locate.
- Spend remaining money on upgrades that improve the current cleanup bottleneck.
| Cleanup Check | What to Inspect | Why It Matters |
|---|---|---|
| Exterior walls | Upper and lower panels | Slots may be separated vertically |
| Doors and windows | Frames, backs, and nearby panels | A single missed slot can delay completion |
| Fences | Both sides and upper sections | Fence segments may require several angles |
| Roof | Accessible panels and edges | Elevated nails are easy to overlook |
| Yard objects | Furniture, signs, and small structures | Compact targets provide quick final payments |
Completion is easiest when you stop treating the map as one giant task. Divide it into zones, finish one zone, and then record which areas still need nails. This approach prevents repeated travel and makes it easier to identify whether the problem is a missing nail, an inaccessible section, or an upgrade requirement.
When only a few nails remain, slow down and scan from different heights. The last missing slot is often hidden behind an object, above your normal view, or on the opposite side of a structure.
Hammer these nails FAQ
Q: What is the main gameplay loop in Hammer these nails?
Pick up loose nails, place them into repair slots, hammer them into objects, earn money, and purchase upgrades that improve reach, speed, strength, automation, and cleanup.
Q: Which upgrades should beginners buy first?
Selection radius and nail handling speed are strong early choices because they reduce movement and interaction time. Extra nails, the dispenser, and the vacuum become more useful as repair groups grow larger.
Q: Should I repair fences early?
Usually, fences are better after your basic range and handling speed improve. Start with small objects and compact house repairs, then return to fences when you can handle more slots efficiently.
Q: How do I find the last missing nail?
Inspect the object from different angles and heights, including rear panels, upper sections, and areas near ladders. Vision and lightning can also help when the remaining nail is difficult to see.
The game’s design supports several playstyles. Players who prefer a relaxed route can focus on small objects and steady upgrades. Players who want faster clearing can combine reach, handling speed, automation, strength, and lightning. Both approaches work best when the upgrade choice matches the obstacle currently slowing progress.
For a practical starting plan, clear nearby low-cost repairs, invest in reach and speed, then work outward through the house, yard, fence, and upper areas. Keep a final cleanup route in mind from the beginning, because methodical inspection is more reliable than repeatedly searching the entire map.
The most efficient Hammer these nails progression comes from matching your upgrade to the task ahead: reach for distance, speed for repetition, automation for dense groups, and power for final clearing.